Migrating Data
Create a Load
A Load is how you send data into EDC. As you create each Load, Vault queries EDC to become aware of the study’s design.
Prerequisite: As a prerequisite to creating a load, you must first create your target vault and upload your source data and mapping configurations.
To create a load:
- Click + Create.
- Enter a Name. Typically includes the date.
- Select the Target Vault. This is the EDC vault where you’re sending the data.
- Select the Source Data.
- Enter the Study Name. This is the Name of the Study Environment where you’re sending the data (for example, “Cholecap_PROD” or “Deetoza_DEV1”).
- Optional: Enter a Note.
- Click Save.
Add Mapping Files to the Load
Now, you can add mapping files to your load. EDC Migrator uses the mapping files to identify which source data sets to load. Note that you can only select mapping files that you’ve already uploaded into the Project.
To add mapping files to your load:
- Navigate to your Load.
- Click Load Mappings to expand that section.
- Click + Create.
- Select the Mapping Config you want to add.
- Click Save + Create to add additional mappings, or click Save.
Repeat for each mapping file that you want to add to the load.
Assign Sites to the Load
To assign Sites to your load:
- Navigate to your Load.
- Click Load Sites to expand that section.
- Enter the Study Site Number. This value must exactly match the Site Number in Vault EDC.
- Optional: Enter the Casebook Version.
- Optional: Enter the Site Name.
- Click Save + Create to add additional sites, or click Save.
Repeat for each site that you want to add to the load.
Start the Load
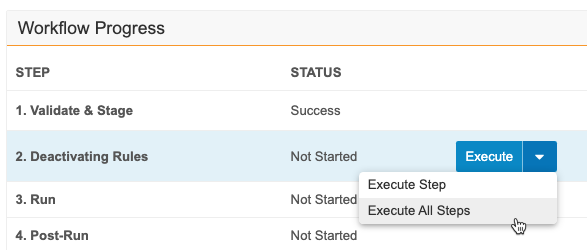
You can execute steps one-by-one, or you can Execute All Steps.
- Navigate to your Load.
- Click Workflow Progress to expand that section.
- Hover over the Step to show the Execute menu.
-
Click Execute or select Execute Step from the menu to execute a single step.

- If executing steps 1-2 and migrating to a production vault, a confirmation dialog appears.
- Type MIGRATE into the text field.
- Click Confirm to continue executing.
-
Select Execute All Steps from the Execute menu to execute all remaining steps.
- If executing all from steps 1-3 and migrating to a production vault, a confirmation dialog appears.
- Type MIGRATE into the text field.
- Click Confirm to continue executing.
Stop an In Progress Step
You can stop a step that is In Progress.
To stop a step when executing one-by-one:
- Navigate to the step that you want to stop.
- Click Stop.
- In the Stop Load confirmation dialog, select how you want to stop:
- Select Stop the load as soon as possible to stop the step immediately. With this option, you will have to start a new load to migrate, and you may need to reset rules.
- Select Wait until the current step is complete before stopping. With this option, you can start the subsequent steps later and will not need to start a new load.
- Click Continue.
- EDC Migrator stops the load. When finished, EDC Migrator sends an email notification.
If you chose Stop the load as soon as possible, you will need to start a new load to migrate data. If Step 2: Deactivating Rules has already run, you must reactivate those rules before you can begin the new load. To reactivate rules, click Reset Rules.
When Executing All Steps, if you choose to stop the entire workflow, the control first reads Stop. After clicking Stop, the control reads Stop Step to indicate that you can also stop an individual step. Stopping an In Progress step also prevents any subsequent steps from running.
Skip a Step
You can skip optional steps in the Workflow Progress section. This is true when executing one-by-one or as part of the Execute All Steps feature.
To skip a step when executing one-by-one:
- Navigate to the step that you want to skip.
- Click Skip.
- Click Continue in the confirmation dialog.
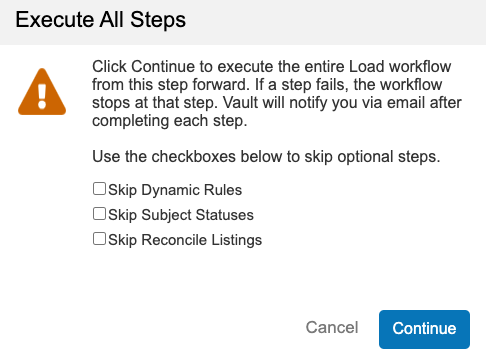
When Executing All Steps, the Skip confirmation dialog allows you to choose which steps you want to skip. Options differ depending on where you are in the Migration workflow.
If you’re at or before Step 7: Dynamic Rules, three checkboxes appear:
- Skip Dynamic Rules
- Skip Subject Statuses
- Skip Reconcile Listings
The Reconcile Listings checkbox only appears for users with the System Administrator and Vault Owner security profiles.
If you’re after Step 7: Dynamic Rules, two checkboxes appear. If you’re at Step 8: Subject Statuses, one checkbox appears.
To skip a step when Executing All Steps:
- Navigate to the step that you want to skip.
- Click Skip.
- In the confirmation dialog, select the appropriate checkbox or checkboxes.
- Click Continue.
- The system skips the chosen step or steps.
When a step is skipped, its status changes to Skipped. The audit trail also reflects this. If the Execute All Steps feature is stopped and restarted, steps previously selected for skipping are not retained.
Track Migration Progress
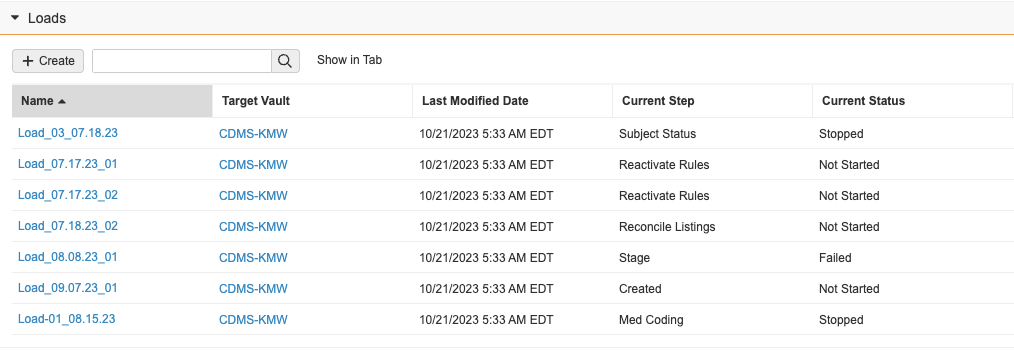
As individual steps are completed, you’ll receive an in-app notification and an email notification. You can review the progress of each step from the Projects > Loads and Projects > Load > Workflow Progress pages. The Loads section of the Projects page provides a snapshot of all project load statuses, including Current Step and Current Status columns.
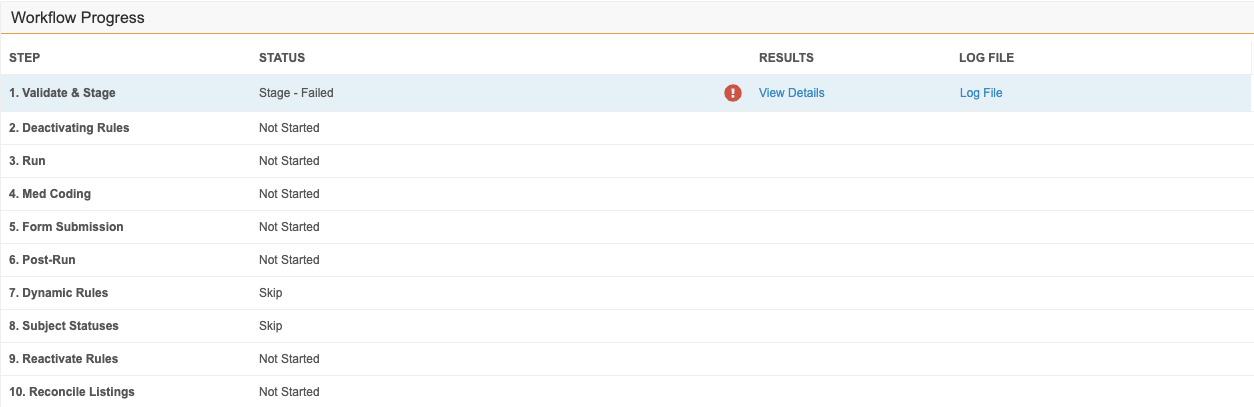
The Workflow Progress section of the Load page offers the Status, Results, and available Log Files of each step.
Veeva Migration Reports
You can track the progression of migration using Veeva Migration Reports. These reports track the completion of individual migration tasks, such as creating a Casebook or Event. Learn more about Veeva Migration Reports.