Workflow Progress Table
This topic explains each step in the Workflow Progress section of the Load page and how to execute each step.
Prerequisites
Users with the Migrator, System Administrator, and Vault Owner security profiles can perform the actions described below by default. If your vault uses user-defined Security Profiles, your profile must grant the following permissions:
| Permission | Controls |
|---|---|
| Tabs: Projects | Ability to access the Projects tab |
The migration workflow migrates instance data into EDC rather than the study design itself. It begins with preparatory steps, such as uploading source data and creating a load, and concludes with the Reactivate Rules workflow step. Understanding each step in the workflow helps you troubleshoot migration errors.
After you create a load and select your mapping configurations, the Workflow Progress table displays the following steps:
- Validate & Stage
- Deactivating Rules
- Run
- Med Coding
- Form Submission
- Post-Run
- Reconcile Listings
- Derived Rules
- Dynamic Rules
- Subject Statuses
- Freeze & Lock
- Reconcile Freeze & Lock
- Reactivate Rules
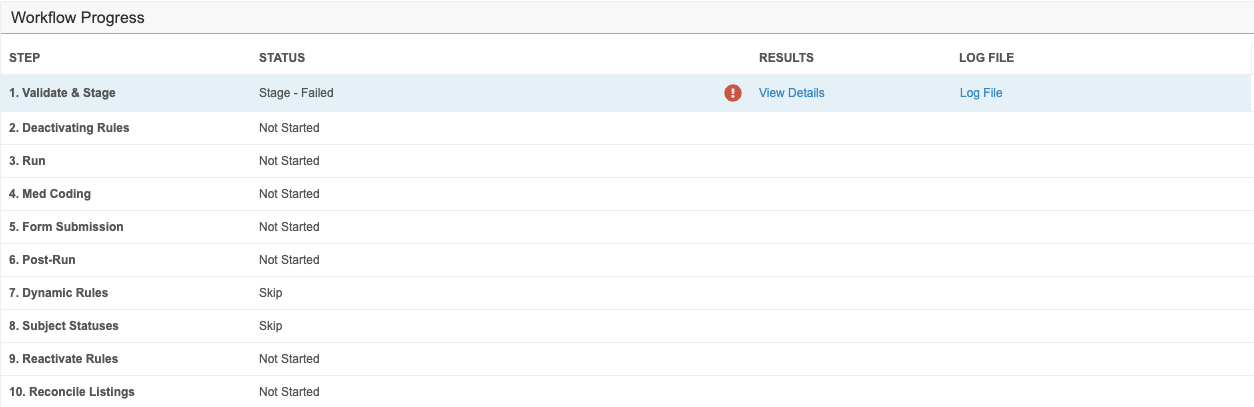
All workflow steps are required except Dynamic Rules and Subject Statuses. You can execute steps individually or all at once using the Execute All Steps feature. You’ll receive an in-app and email notification when each step is complete. The Status column also identifies the progress of each step. The following statuses are provided in the table:
- Not Started
- Queued
- In Progress
- Success
- Failed
- Skip/Skipped
- Stopping
Validate & Stage
The Validate & Stage step is the first step in the migration process. It verifies that source data matches the target study’s structure before the system begins migrating.
Validate & Stage comprises four phases:
- Parsing
- Validation
- Add Study ID
- Staging
During the Parsing phase, the system reads the YAML and CSV files, applies changes to the CSV file from the YAML file, and then parses the CSV file.
During the Validation phase, the system obtains the Study Design from EDC and validates each record, including date formats, form statuses, and sequence numbers for event groups, forms, and item groups.
The Migrator logs an error in the log file and stops the migration process if a sequence number does any of the following:
- Contains letters or text
- Includes decimal places other than .0 (for example, the Migrator will accept 1.0 but reject 1.2)
- Falls below the minimum starting threshold set in the header or logheader YAML files (for example, source data records contain sequence numbers that begin with 0, but
formSequenceStartingNumberin the header file is set to 1)
During the Add Study ID phase, the system attaches study definition IDs to records and sends those records to staging during the Staging phase.
To initiate the validation process:
- Navigate to your Load.
- Click Workflow Progress to expand that section.
- Hover over the Validate & Stage step to show the Execute menu.
- Select Execute to execute both Validation and Staging.
- Click Validate Only to validate without staging, then click Stage Load to stage the load when you’re ready.
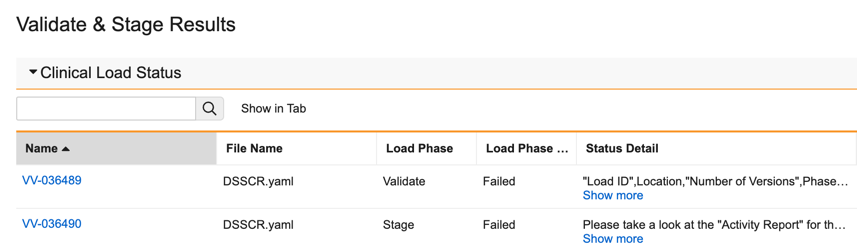
- Optional: Click View Details to open the Validate & Stage Results page.
- Optional: Click Log File to download a CSV attachment of errors and warnings.
Error Handling & Logging
If the Validation or Staging phases fail, the system captures all errors and warnings in a single log file (for example, values that exceed the character limits). The system also notifies the migrator of the failure via email, which contains a link to view the Validate & Stage Results page.
You can review errors and warnings in two ways: via a summary in the Validate & Stage Results > Status Detail column or by downloading the complete log file. The Status Detail column displays a summary (up to 32,000 characters) of errors and warnings per YAML file. Click Show more in the Status Detail column to expand the summary in a new window. Click Close to close the window.
Deactivating Rules
This step deactivates all active rules. The Reactivate Rules step then reactivates them.
- Click Execute > Execute All Steps to deactivate rules.
- Optional: Click Log File to download a CSV of the deactivated rules.
Run
During the Run step, data is migrated from staging to EDC and derivation rules are executed.
- Click Execute > Execute All Steps to migrate the data from the staging database into EDC.
- Optional: Click View Details to view step results on the Run Summary page.
- Optional: Click Log File to download a CSV of log file errors and warnings.
Med Coding
During Med Coding, coding data is migrated from staging to CDMS Vault. Coding data must be prepared prior to migration.
To migrate coding data:
- Click Execute > Execute Step to migrate coding data.
- Click Continue in the confirmation dialog.
- Optional: Click View Details to navigate to the Summary page and view the Med Coding Summary table.
Med Coding Summary Table
The Med Coding Summary table highlights the progress of the Med Coding step: Create and Send. The Create stage references the point at which coding requests are created and contains the counts for that stage. The Send stage references the point at which coding requests are sent to EDC Coder and contains the counts for those requests. The counts for the Send stage are only populated when the Create stage is fully complete.
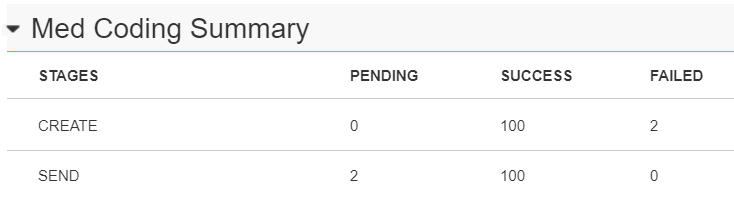
Each stage is given a status of Pending, Success, or Failed. When the Med Coding step succeeds, the Create and *Send *counts match. Differences in the count indicate a failure.
For example: If 50 records are successfully created and two (2) records fail, the Send stage shows 50 as Success and two (2) as Pending. The Pending count reflects the number of records that failed the Create step. If a record fails during the Send stage, it appears under the Failed column for Send.
All rows are exported into the Migration Report.
Form Submission
This step allows you to submit all forms.
- Click Execute > Execute All Steps to submit forms.
- Click Continue in the confirmation dialog.
- Optional: Click View Details to view results in the Form Submission table.
Post-Run
The Post-Run step creates queries and executes other post-processes. It does not apply locked and frozen attributes, the Freeze & Lock step executes these actions.
- Click Execute > Execute All Steps to initiate post-run processes.
- Click Continue in the confirmation dialog.
- Optional: Click View Details to view the Post-Run Summary page.
- Optional: Click Log File to download a CSV of log file errors and warnings.
Reconcile Listings
This step synchronizes EDC data with the EDC UI to ensure a successful migration. Only users with System Administrator or Vault Owner security profiles can execute this step. There is no Skip option.
- Click Execute > Execute All Steps to reconcile listings.
- Click Continue in the confirmation dialog.
Derived Rules
This step executes Derived Rules after all objects are created and before applying attributes.
To execute derived rules:
- Click Execute > Execute All Steps.
- Click Skip to skip this step.
- If executing, click Continue in the confirmation dialog.
- Optional: Click Log File to download a CSV of error messages.
- Optional: Click EDC Job History to view EDC log files.
- Optional: Click Diagnostic Data to review performance data, such as fragment statistics and performance metrics.
Dynamic Rules
This step executes or skips the Dynamic Rules. If it fails and rules are reset, the workflow progress table updates to reflect a Success status for the Reactivate Rules step.
- Click Execute > Execute All Steps to activate and run Dynamic Rules.
- Click Skip to skip this step.
- If executing, click Continue in the confirmation dialog.
- Optional: Click Log File to download a CSV of the dynamic rules that were executed.
- Optional: Click EDC Job History to view EDC log files.
- Optional: Click Diagnostic Data to review performance data, such as fragment statistics and performance metrics.
Subject Statuses
With this step, Subject Status rules are either executed or skipped in the Workflow Progress table.
When executed, the system automatically sets subject statuses in the following order:
-
Pre Screen
-
Consented
-
In Screening
-
Screen Failure
-
Enrolled
-
Randomized
-
Started Treatment
-
End of Treatment
-
Withdrawn
-
Started Follow Up
-
Lost to Follow Up
-
Complete
The default EDC Subject Status execution order is required for this step.
- Click Execute > Execute All Steps to activate and run Subject Status rules.
- Click Skip to skip this step.
- If executing, click Continue in the confirmation dialog.
- Optional: Click View Details to view results.
- Optional: Click Log File to download a CSV of log file errors.
- Optional: Click EDC Job History to view EDC log files.
- Optional: Click Diagnostic Data to review performance data, such as fragment statistics and performance metrics.
If Execute All Steps is selected in any step prior, the system attempts to execute the entire workflow. In this case, the Subject Statuses step will only work if the previous step was successful. If the previous step failed, the step will not auto-start. Once the previous step is confirmed with a status of Success, the Subject Status rules deactivated in step two are reactivated and executed.
Freeze & Lock
During Freeze & Lock, the Migrator applies frozen and locked attributes to migrating objects.
To apply frozen and locked attributes:
- Click Execute > Execute All Steps to apply frozen and locked attributes.
- Optional: Click Log File to download a CSV of log file errors and warnings.
Reconcile Freeze & Lock
During Reconcile Freeze & Lock, click Execute > Execute All Steps to create casebook summaries for frozen and locked objects.
Reactivate Rules
This is the final workflow step. It reactivates all rules that step 2, Deactivate Rules, deactivates.
- Click Execute > Execute All Steps to Reactivate Rules.
- Click Continue in the confirmation dialog.
- Optional: Click Log File to download a CSV of the reactivated rules.
The Reset Rules after Failure option performs the same actions as the Reactivate Rules step. This option appears next to any step that fails between steps three and ten. If clicked, all the rules deactivated as part of step two are reactivated.
Troubleshooting Rule Failures
If a rule step (Derived Rules, Dynamic Rules, or Subject Statuses) fails during execution, use the following guidance to resolve errors:
- Review execution errors and warnings by downloading the Log File.
- Check for batch processing issues in the EDC Job History.
- Click Diagnostic Data during the Derived Rules step to find rules that need optimization.
- Click Reset Rules after Failure next to a failed step before re-running the load.